Are you looking to improve your indoor air quality and enhance the efficiency of your HVAC system? Installing UV lights in your HVAC system could be the perfect solution. In this complete guide by Maven Air Care, we’ll delve into the benefits, the installation process, and tips for maintaining HVAC UV lights.
Benefits of HVAC UV Light Installation
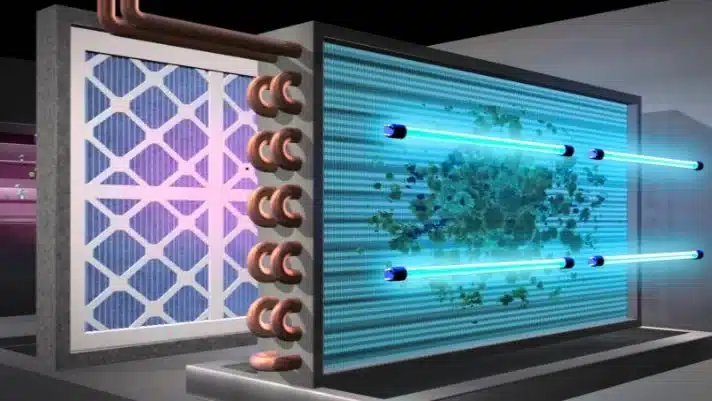
UV lights installed in your HVAC system offer numerous advantages, including:
- Improved Air Quality: UV lights kill bacteria, viruses, and mold spores, ensuring cleaner air.
- Reduced Allergens: By eliminating mold and other allergens, UV lights help reduce allergy symptoms.
- Enhanced HVAC Efficiency: UV lights prevent microbial buildup on coils, maintaining system efficiency.
- Odor Elimination: UV lights neutralize odors caused by mold and bacteria.
- Extended HVAC Lifespan: Reduced microbial growth means less wear and tear on your HVAC system.
Step-by-Step Installation Process
- Safety First: Turn off the power to your HVAC system to prevent any electrical accidents.
- Choose the Right Location: Identify the optimal location for the UV light, typically near the evaporator coil for maximum effectiveness.
- Install the UV Light: Secure the UV light unit using screws or brackets as per the manufacturer’s instructions.
- Wiring: Connect the UV light to the HVAC system’s power supply, following the wiring diagram provided by the manufacturer.
- Test the System: Turn the power back on and check that the UV light is functioning correctly.
- Regular Maintenance: Schedule regular checks to ensure the UV light is operating effectively and replace the bulbs as needed.
Maintenance Tips for UV Lights
- Regular Inspections: Check the UV light unit at least twice a year to ensure it is functioning correctly.
- Clean the Bulbs: Dust and debris can accumulate on the bulbs, reducing their effectiveness. Clean the bulbs regularly with a soft cloth.
- Replace Bulbs: UV bulbs typically last about a year. Replace them annually to maintain optimal performance.
- Monitor HVAC System: Keep an eye on your HVAC system’s performance and air quality to ensure the UV light is having the desired effect.
- Professional Service: Consider having a professional inspect and maintain your UV light installation periodically.
FAQs
Q: How long do HVAC UV lights last?
A: Most UV light bulbs last about 9-12 months, but it’s a good idea to replace them annually to ensure maximum effectiveness.
Q: Are UV lights safe for my HVAC system?
A: Yes, UV lights are safe and can actually extend the lifespan of your HVAC system by preventing microbial buildup.
Q: Can I install HVAC UV lights myself?
A: While it’s possible for experienced DIYers to install UV lights, we recommend professional installation to ensure safety and optimal performance.
Q: Do UV lights eliminate all indoor air pollutants?
A: UV lights are effective against biological contaminants like bacteria and mold, but they don’t eliminate all pollutants such as dust or chemical fumes.
Q: How much do HVAC UV lights cost?
A: The cost varies depending on the system and installation, but you can expect to spend between $2000 and $2500 for the unit and installation.
By following this complete guide to HVAC UV light installation from Maven Air Care, you’ll be well on your way to enjoying cleaner, healthier air in your home. Enhance your HVAC system’s efficiency and ensure your indoor environment is as comfortable as possible!


